


-
My sister has requested another bundle of cards for her to use so I've done this once before where I made a bunch. They're mostly prototype-ish to try out new techniques and styles and oftentimes they're one offs. It's a great chance for me to play with designs then decide if I want to repeat making the design or if a particular design was just a one time deal. Maybe the design is too complicated or just plain ugly (this has happened a few times -_-)
This is one of the cards that I started with after seeing another card-maker (can't recall who) using punches to make cutouts - essentially using the negative space instead of the positive for the card. I went one step further and made it into a shaker card. I put a circle of adhesive foam around each of the flowers I punched and added different colored microbeads to each flower punch.
I love how fun this card turned out and I'd probably do it again. I'm in love with these microbeads! I've only used microbeads on my fingernails for nail art so when I started seeing them released as craft supplies, I didn't know what to do with them. But I think they're great for shaker cards! I think my sister will be happy with this one. She mentioned that she used some of the congrats cards I gave her before for birthdays also. "Let's Celebrate" is great for all occasions!
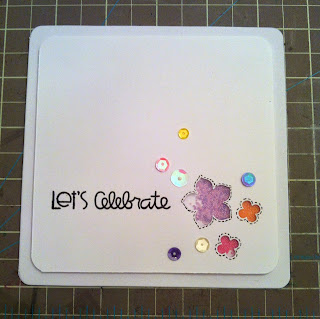

Punches: Stampin Up - Itty Bitty Punch Pack, Petite Petals
Microbeads: Martha Stewart - Kunzite/Amethyst, Tourmaline, Fire Opal
Stamp: Papersmooches - Sentiment Sampler
-
Created this card using the free (at the time) silhouette cut file for flowers in a bell jar for my sister. I got crazy ambitious and made it into a shaker shape! I used the belljar shape and created an edge only shape of the belljar using silhouette designer. Then cut 1 layer of transparency film for the bell jar cover + 8 layers of transparency film for the edges to make the center hollow. I threw a couple of sequins and beads in there then glued the cover on. It turned out cuter than I'd expected!Admittedly this project did take me a few hours (~5 hours I think) with all of the planning, cutting, gluing. And then I made an envelope for it since the whole card + easel was an odd shape. I used my envelope punch board and made this envelope based on an idea from My Blue Bike 101 who had a video about making coin envelopes.It all came together so well! I used a bunch of techniques I was new to or had never done before and was super happy when I was done! And of course my sister loved it which made it all worth while!


Showing posts with label shaker card. Show all posts
Showing posts with label shaker card. Show all posts


Subscribe to:
Posts (Atom)


 Posts
Posts


